Assignment 3 Critical Review:
1:1 Fuel Tank (Assignment 2):
- Approach:


From this particular approach we understood the Grasshopper script provided by Andrew Wallace, and discovered that the surfaces and shape were based of isocurves that could be tweaked parametrically and also manually. This was one major strength our team had in customizing the initial design with the parametric tool Grasshopper 3d.
 |
| Working with parametric software Grasshopper 3D |
This how we produced and designed a final form for the laser cut template.


Attempting this design and approach multiple times incorporated various steps, processes and ideas on how to replicate the form. I was chosen to produce the left side panel for the 1:1 fuel tank.
 |
| Final form on template |
- Strengths and Weaknesses:
With previous knowledge on digital fabrication in particular laser cutting and also knowledge on using the parametric tool of Grasshopper 3d were great strengths that our team members had. A major weakness was that none of us had worked with shaping metal sheets before in particular aluminium shaping.
This was a good way of determining the cross over between digital fabrication methods with traditional fabrication methods.
 |
| Directional curvature needed |
 |
| Using nylon mallet to rework panel (2nd attempt) |
My first initial working and attempt to produce the side piece, I used a range of dollies and a torus stump to produce a similar shape to the Torus in Assignment 1. This method did not work out as the dollies available weren't the right curvature and produced various dents when starting the piece. This made it difficult to smooth out and pucker out any defects.
 |
| Smooth reverse curve using torus stump |
 |
| Torus (Assignment 1) |
Through this process I realized that the aluminium sheet was very sensitive in forming shapes on due to the difference in scale from the Torus in Assignment 1. This work done on the piece made the initial sheet very complicated to fix since it was overworked. From this I learnt the exaggeration of the term "Less is more".
 |
| Blister produced for attempt 2 side panel similar degree than the blister in Assignment 1 |
 |
| The blister, my strongest and best finished form from Assignment 1 |
When this process failed, the approached changed to the utility of a blister template to create this indentation for the left side panel. From this i needed to start of with a fresh new piece of aluminum. I chose to take this approach due to it was one of my strongest and best pieces produces from Assignment 1 "The Blister". Above you can see that different between each blister attempt one having a larger scale and one having a more distinct shape according to the template.
 |
| Blister outcome before cut o |
From here I could see how this strength of making the blister once again but at a larger scale and a different shape would be utilized in the world around me such as in bike tanks, chair designs or facade designs. But with this particular strength of making the blister produced a tricky outcome where I was not able to make the panel curve in a reverse direction. I believe this was due to the blister edge playing a major roll in the panels overall stiffness.
 |
| Reverse curving stopped by blister |
Another weakness in this assignment was that my particular side piece for the fuel tank had to be symmetrically similar to Ryan Johann's right side piece. This forced us to have to work together at the same times and also made us have to always cross reference the form between the template and ourselves.
- Alternatives to Approach:
 |
| Rubbing method |
A major alternative to the side pieces approach was to understand the way the aluminum could be formed in various directions and how would it effect a process or step after a particular form is produced on the side piece aluminium sheet. I tested a method of rubbing the side piece onto the side of a cylindrical stump whilst applying force on each end on the sheet.
 |
| Symmetrically referenced to template |
This method had great accuracy results that were referenced with the laser cut template. This method taught me a particular way of how to form a shape that made symmetrical parts to have the same curvature of one another.
 |
| Desired curvature of each side panel |
As you can see in the images this particular method produced great results and made an alternative approach of receiving a smoother finish than by using mallets and dollies to gain a symmetrical curvature throughout two side pieces.
Another alternative approach would be utilizing a blister template but it would have a cross directional curve within the template. This would be to produce an indentation on the side panel whilst maintaining the curvature of the panel in a horizontal direction producing the form needed for the desired shape. Below is a diagram presenting the construction of the alternative approach with particular reference in the aluminium sheets form. The pressure between the two sides of the blister template would need to be fixed together tightly with large nuts and bolts.
 |
| Diagram of alternative approach using a blister template |
- Alternatives to Techniques and Tools (Demonstration):


The paneling technique was quite tricky to work with as we have multiple surfaces that were inspired by the torus (Assignment 1). The outer edges of the side panels would work with the technique but the interior indentation from the laser cut temple restricted the papers form of being stable and not majorly creased.
An alternative approach I would use next time is to use the Grasshopper file and extract the side surface and project it flat on a XY plane. The edge of the surface could then be exported into Adobe Illustrator and could be printed and cut out on a sheet with the correct scale. This would of been a more accurate way of extracting the shape of each panel than manually tracing then printing out an outline.


Multiple styles of dollies and mallets were used to force the aluminium piece to have a curved lip around the edges. This produced the desired curve but resulted in marks and compressed the sections of the aluminium. When I started on a new piece I did not used dollies for that particular reason.


Wooden stumps were used to create the torus form and shape, with the sweeping form I had to use various sized stumps for particular sections of panel. This was time consuming in changing for which stump I needed to use but produced great results in the curvature of the panel as desired. One of the largest stumps was close with the degree of curvature needed for the template which was a huge benefit.


The levered guillotine produced smooth cuts but ultimately warped and distorted the aluminium sheets when cutting due to one side curled up and another when down. This made an uneven panel when cut, I avoided using this tool when cutting with my second attempt at the panel. The large English wheel didn't come particularly handy with attempting my second panel due to the degree of curvature was higher than the most orbital roller for it. This is why for my second attempt I decided to use just the smaller English wheels as there was a wide range of rollers and it could smooth out inside of tight degree curves on the surface (especially the exterior curves).
Contrast and Comparison:
A major aspect of my particular piece of the fuel tank was symmetry and how it related to the overall shape of the assignment.
With my selected panel of the fuel tank being a side panel this relied heavily on the aspect of symmetry. Ryan Johann created the left side panel. This made the assembly and metal forming process harder than usual. This is because when we worked on forming the panels we would have to work on them the same time and also have to regularly cross reference the panels. This cross referencing involved discussing the degree of curvature to sit on the laser cut template, the methods and tools used to form particular sections of the panels.
 |
| Cross Referencing each panel side by side |
With this comparison method we also discussed which metal forming processes and methods form Assignment 1 that have been proven to give desired results. With using symmetrically driven approach to my panel I had to compare and contrast between the other side panel and the waffle template often to ensure my progress on working the aluminium panel was to standard.
 |
| This angle portrays the optimal comparison and contrasting method of both panel |
- Previous examples of my own work:
With the side panels being inspired from the blister and the tours from Assignment 1, I knew that methods from these previous examples determined which processes and tools to use to reach a desired result working with aluminium sheets. This knowledge and skill ultimately carried through into Assignment 2 (Fuel Tank) made the understanding of working towards a from clearer.

The aspects learnt in combining these two separate metal forming objects involved an understanding of relationship between scale, curvature and the shrinking and stretching methods needed for the particular form. The 3 attempts towards the side panel of the fuel tank was frustrating at times but each attempt ultimately progressed myself closer and closer towards the final panel that would match symmetrically with Ryan Johanns' panel as well as the custom made waffle template.
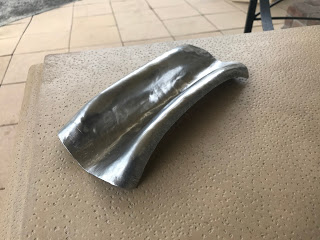
 |
| Final attempt of side panel with desired form matching the template |
- Work of classmates:
Below is Ryan Johann's left side panel of our custom designed fuel tank. Here you can see how the metal forming processes reference strongly to my right side panel. With the forms portraying a symmetrically driven approach and a well finished piece. Both panels ultimately presents the difficulty of the metal forming process is in industry today. This also presents the combination of utilizing new fabrication processes with traditional fabrication process to form a product.
 |
| Ryan Johann's final panel |
Reflection on discipline:
 |
| Parametric tool (Grasshopper 3d) used to create a custom template that needed to be matched with a manually fabricated produce using traditional techniques (combination of two distinct methods complimenting one another) |
Evaluation:
I was surprised and pleased with the result of my panel as I have had no previous experience in metal forming and shaping before starting BEIL0014. The experience has provoked great skills that will be utilized in the future. I can see the groups custom designed 1:1 fuel tank portraying a range of characteristics from earlier assignments such as the torus, blister, tray and bowl. From these characteristics I can see how each methods and form can have implications and applications in industry in relation to shape, form and strength of metal working.

The elements I acknowledge success within are the smooth degree and transition of the gradual implementation of the indentation. This produces an overall aesthetic looking form that personally reflects speed and aerodynamics within the fuel tank. The elements that i would acknowledge to be areas of improvement would include the edge finishes and minor high spots or dents. The edge finishes I believe has the opportunity to be filed more evenly and to be sanded or minorly hammered to decrease the degree of mallet marks. The high spots or dents where produced from the shrinker, I believe I personally should've taken more time and increased the level of accuracy in this process, this would minimize the degree of the high spots or dents.

When i reference my panel with the other panels in relation of how they join and sit proves my achievements and the teams successful collaboration. This uplifts the idea of the power of collaboration. In reflection the tasks from Assignment 1 all carried out various attributes and methods of metal forming that all have a particular purpose behind them. The 1:1 tank has provoked greater knowledge in material properties and working with them to produce desired forms and shapes. The assignment has also proven the complexities and intricacies involved with metal forming in creating custom motorbike tanks.
No comments:
Post a Comment